本次演示为升级Oracle rac数据库,用GI的psu升级,从11.2.0.4.0升级到11.2.0.4.8。
演示环境:
两个节点:rac1、rac2
GI的PSU升级包(11.2.0.4.8):p21352635_112040_Linux-x86-64.zip
解压缩后的目录:/setup/oracleUp/21523375
oracle 的$ORACLE_HOME:/u01/app/oracle/product/11.2.0/db_1
一:升级OPatch
下载最新的opatch程序并替换GI_HOME和ORACLE_HOME下的OPatch目录
注意:rac1和rac2两个节点的grid和oracle都要升级OPatch版本
到OPatch目录下:
- [oracle@rac1 db_1] $ pwd
- /u01/app/oracle/product/11.2.0/db_1
2.
备份之前的OPatch目录:
- [oracle@rac1 db_1] $ mv OPatch/ OPatch_20151116/
解压缩下载的最新的OPatch版本:
- [oracle@rac1 db_1]$ unzip p6880880_112000_Linux-x86-64.zip
查看opatch版本,已升级到最新的11.2.0.3.12版本 view plain copy
- [oracle@rac1 db_1] $ cd OPatch/
- [oracle@rac1 OPatch] $ ./opatch version
- OPatch Version: 11.2.0.3.12OPatch succeeded.
2.
二:生成ocm文件
在rac1和rac2分别生成ocm.rsp文件。
- [oracle@rac1 psu]$ pwd
- /u01/app/oracle/psu
- [oracle@rac1 psu]$ /u01/app/oracle/product/11.2.0/db_1/OPatch/ocm/bin/emocmrsp
- [oracle@rac1 psu]$ ls
- ocm.rsp
3.
5.
三:给GRID_HOME安装补丁
1、rac1:
root用户执行
- [root@rac1 ~]# /u01/app/11.2.0/grid/OPatch/opatch auto /setup/oracleUp/21523375 -oh /u01/app/11.2.0/grid/ -ocmrf /u01/app/oracle/psu/ocm.rsp
- Executing /u01/app/11.2.0/grid/perl/bin/perl/u01/app/11.2.0/grid/OPatch/crs/patch11203.pl -patchdir /setup/oracleUp -patchn21523375 -oh /u01/app/11.2.0/grid/ -ocmrf /u01/app/oracle/psu/ocm.rsp-paramfile /u01/app/11.2.0/grid/crs/install/crsconfig_params
- This is the main log file: /u01/app/11.2.0/grid/cfgtoollogs/opatchauto2015-11-16_15-39-09.log
- This file will show your detected configuration and all the stepsthat opatchauto attempted to do on your system:
- /u01/app/11.2.0/grid/cfgtoollogs/opatchauto2015-11-16_15-39-09.report.log
- 2015-11-16 15:39:09: Starting Clusterware Patch Setup
- Using configuration parameter file:/u01/app/11.2.0/grid/crs/install/crsconfig_params
- Stopping CRS…
- Stopped CRS successfully
- patch /setup/oracleUp/21523375/21352635 apply successful for home /u01/app/11.2.0/grid
- patch /setup/oracleUp/21523375/21352649 apply successful for home /u01/app/11.2.0/grid
- patch /setup/oracleUp/21523375/21352642 apply successful for home /u01/app/11.2.0/grid
- Starting CRS…
- Installing Trace File Analyzer
- CRS-4123: Oracle High Availability Services has been started.
- opatch auto succeeded.
2. 3. 4.
6.
8.
11.
14.
17.
21.
25.
2、上述执行完毕后,再在rac2上执行:
root用户执行
- [root@rac2 ~]# /u01/app/11.2.0/grid/OPatch/opatch auto /setup/oracleUp/21523375 -oh /u01/app/11.2.0/grid/ -ocmrf /u01/app/oracle/psu/ocm.rsp
四:给DB HOME安装补丁集
1、rac1:
root用户执行
- [root@rac1 ~]#/u01/app/oracle/product/11.2.0/db_1/OPatch/opatch auto /setup/oracleUp/21523375 -oh /u01/app/oracle/product/11.2.0/db_1 -ocmrf /u01/app/oracle/psu/ocm.rsp
- Executing /u01/app/11.2.0/grid/perl/bin/perl/u01/app/oracle/product/11.2.0/db_1/OPatch/crs/patch11203.pl -patchdir/setup/oracleUp -patchn 21523375 -oh /u01/app/oracle/product/11.2.0/db_1 -ocmrf/u01/app/oracle/psu/ocm.rsp -paramfile /u01/app/11.2.0/grid/crs/install/crsconfig_params
- This is the main log file:/u01/app/oracle/product/11.2.0/db_1/cfgtoollogs/opatchauto2015-11-16_16-31-45.log
- This file will show your detected configuration and all the stepsthat opatchauto attempted to do on your system:
- /u01/app/oracle/product/11.2.0/db_1/cfgtoollogs/opatchauto2015-11-16_16-31-45.report.log
- 2015-11-16 16:31:45: Starting Clusterware Patch Setup
- Using configuration parameter file:/u01/app/11.2.0/grid/crs/install/crsconfig_params
- Stopping RAC /u01/app/oracle/product/11.2.0/db_1 …
- Stopped RAC /u01/app/oracle/product/11.2.0/db_1 successfully
- patch /setup/oracleUp/21523375/21352635 apply successful for home /u01/app/oracle/product/11.2.0/db_1
- patch /setup/oracleUp/21523375/21352649/custom/server/21352649 apply successful for home /u01/app/oracle/product/11.2.0/db_1
- Starting RAC /u01/app/oracle/product/11.2.0/db_1 …
- Started RAC /u01/app/oracle/product/11.2.0/db_1 successfully
- opatch auto succeeded.
2. 3.
5.
7.
10.
13.
16.
19.
22.
2、上述执行完毕后,再在rac2上执行:
root用户执行
- [root@rac2 ~]#/u01/app/oracle/product/11.2.0/db_1/OPatch/opatch auto /setup/oracleUp/21523375 -oh /u01/app/oracle/product/11.2.0/db_1 -ocmrf /u01/app/oracle/psu/ocm.rsp
五:更新dba_registry_history视图信息
- [oracle@rac1 ~]$ sqlplus / as sysdba
- SQL>@?/rdbms/admin/catbundle.sqlpsu apply
2.
- SQL>select action,comments from registry$history;
- ACTION COMMENTS
- ———- ———-
- APPLY Patchset 11.2.0.2.0
- APPLY PSU 11.2.0.4.8
- 2 rows selected
2.
7.
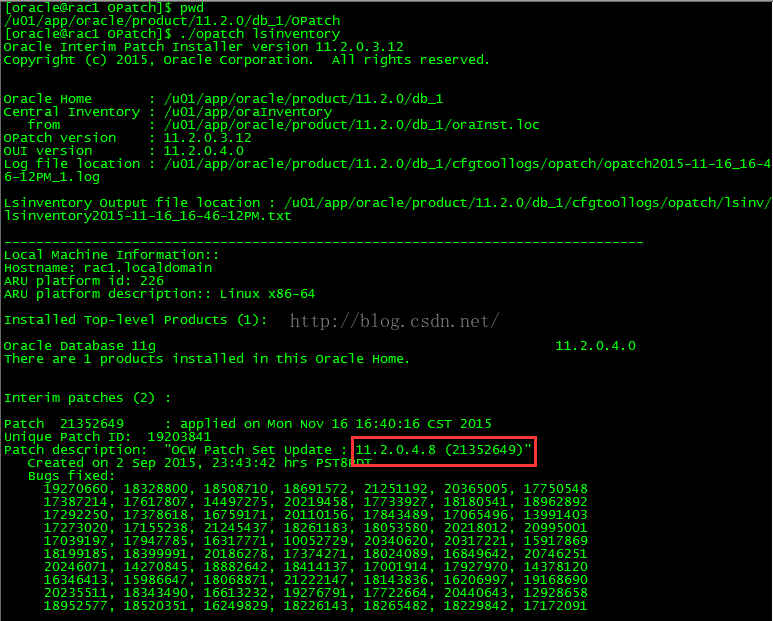
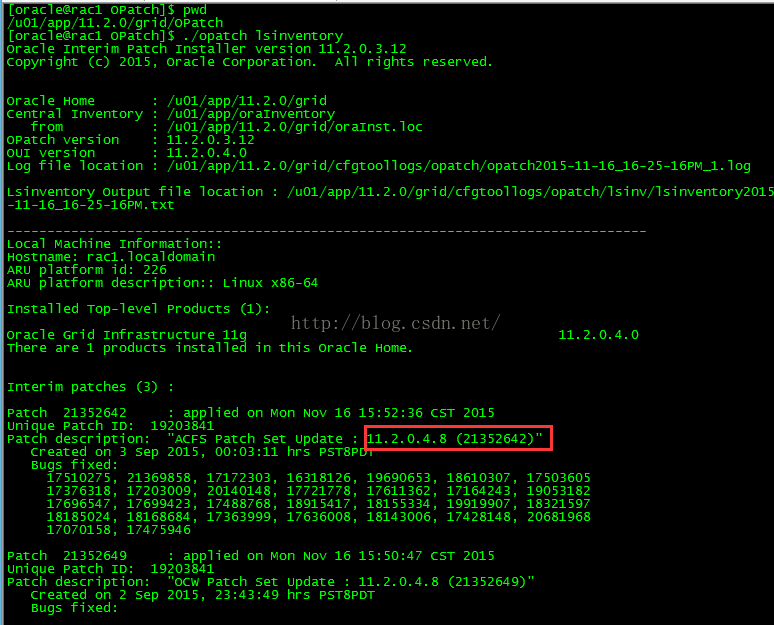
六:检查GI及oracle版本
查看rac1和rac2两个节点的GI和oracle版本,下面以rac1为例
查看GI版本,已升级到11.2.0.4.8
查看oracle版本,已升级到11.2.0.4.8